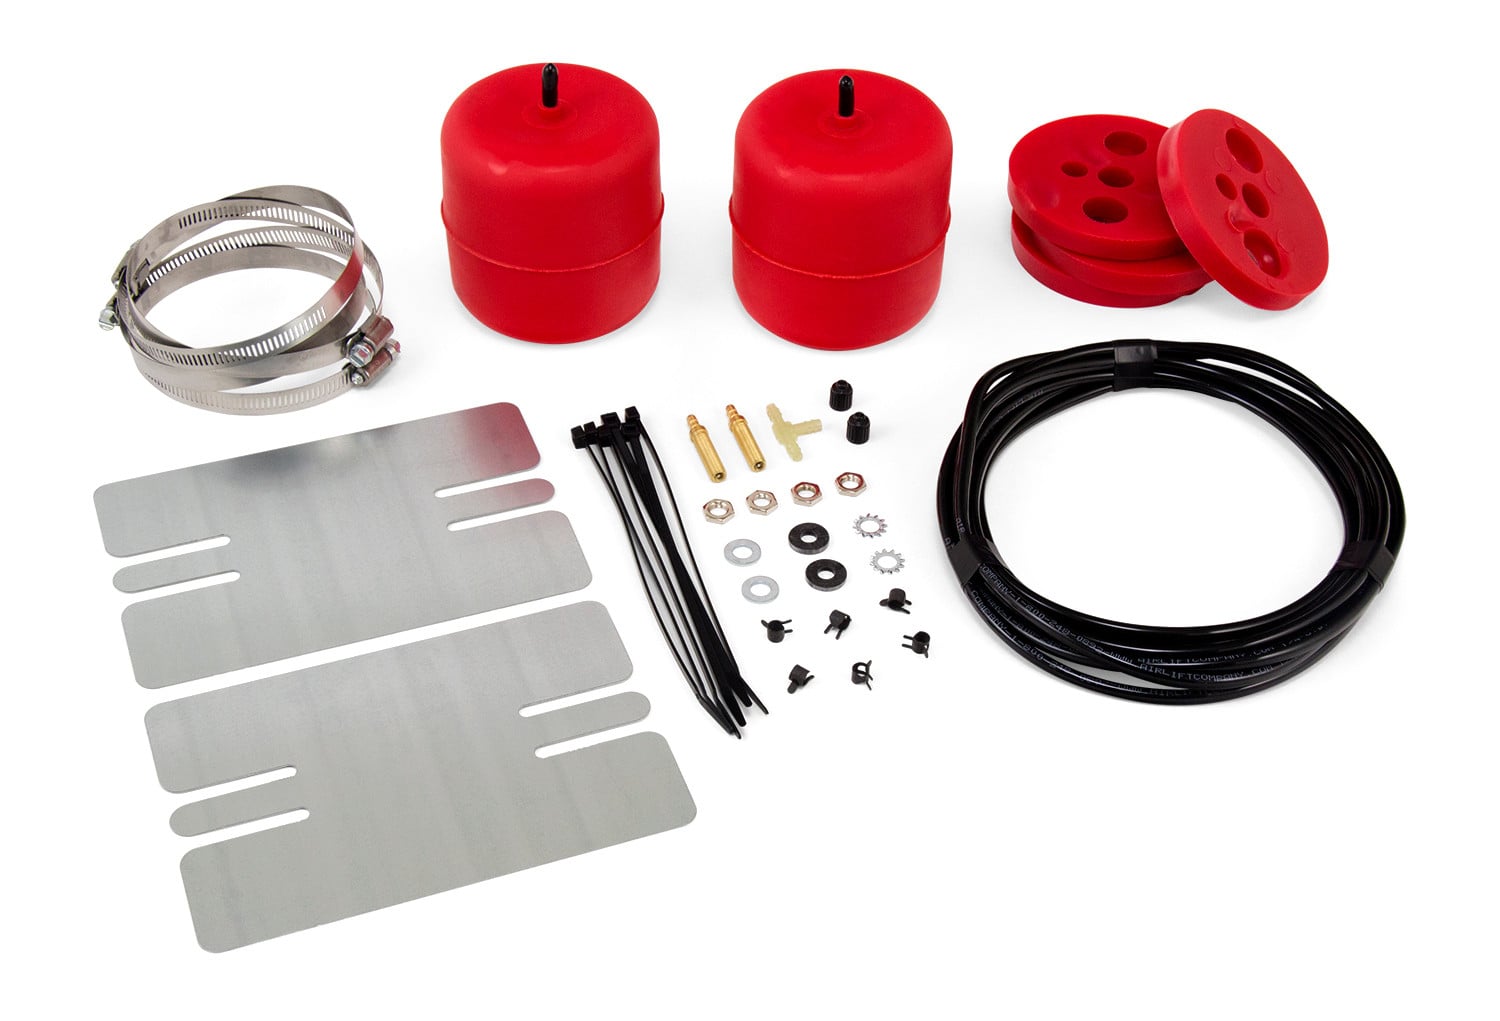
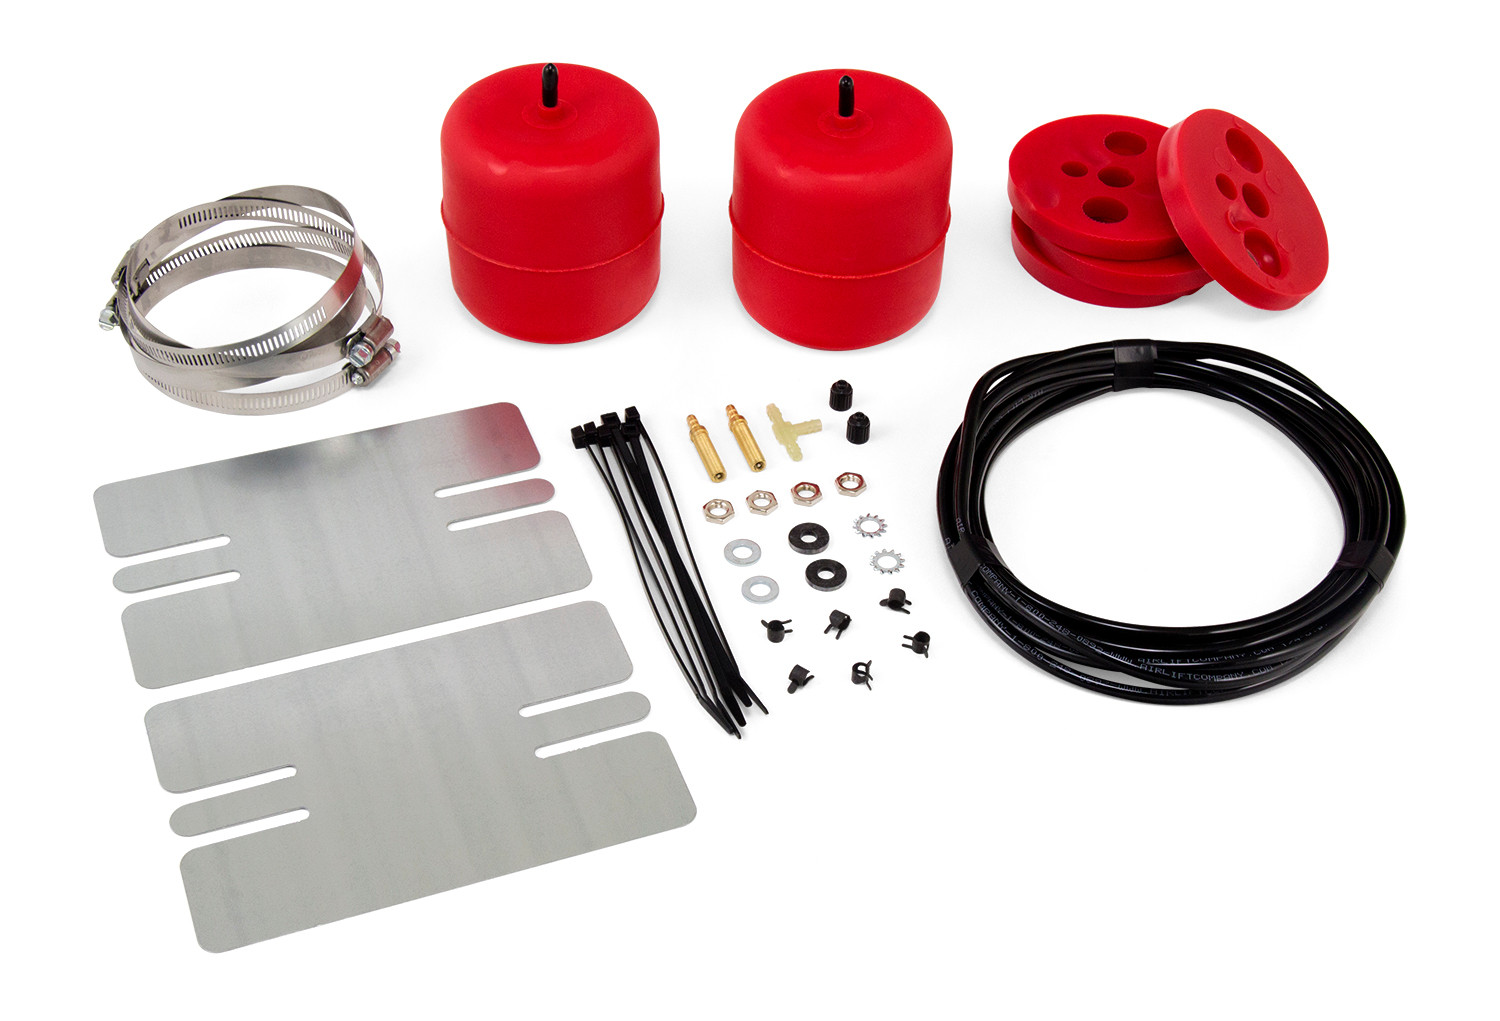
Air Lift Air Lift 1000 Universal 60909Air LiftOriginal price was $206.99. Current price is $149.99.In Stock
View productOur in-house experts typically reply within one business day.

Air Lift

Always the correct part
We know our products
Quality Products
Free Shipping!
Always the correct part
We know our products
Quality Products
Free Shipping!
AL1000 Universal Kit Finder.pdf
MN-1002_Universal AL1000.pdf
AD-938 LS user guide.pdf
With the ability to fit almost any open coil spring, the Air Lift 1000 Universal kits from Air Lift are our most versatile ever.

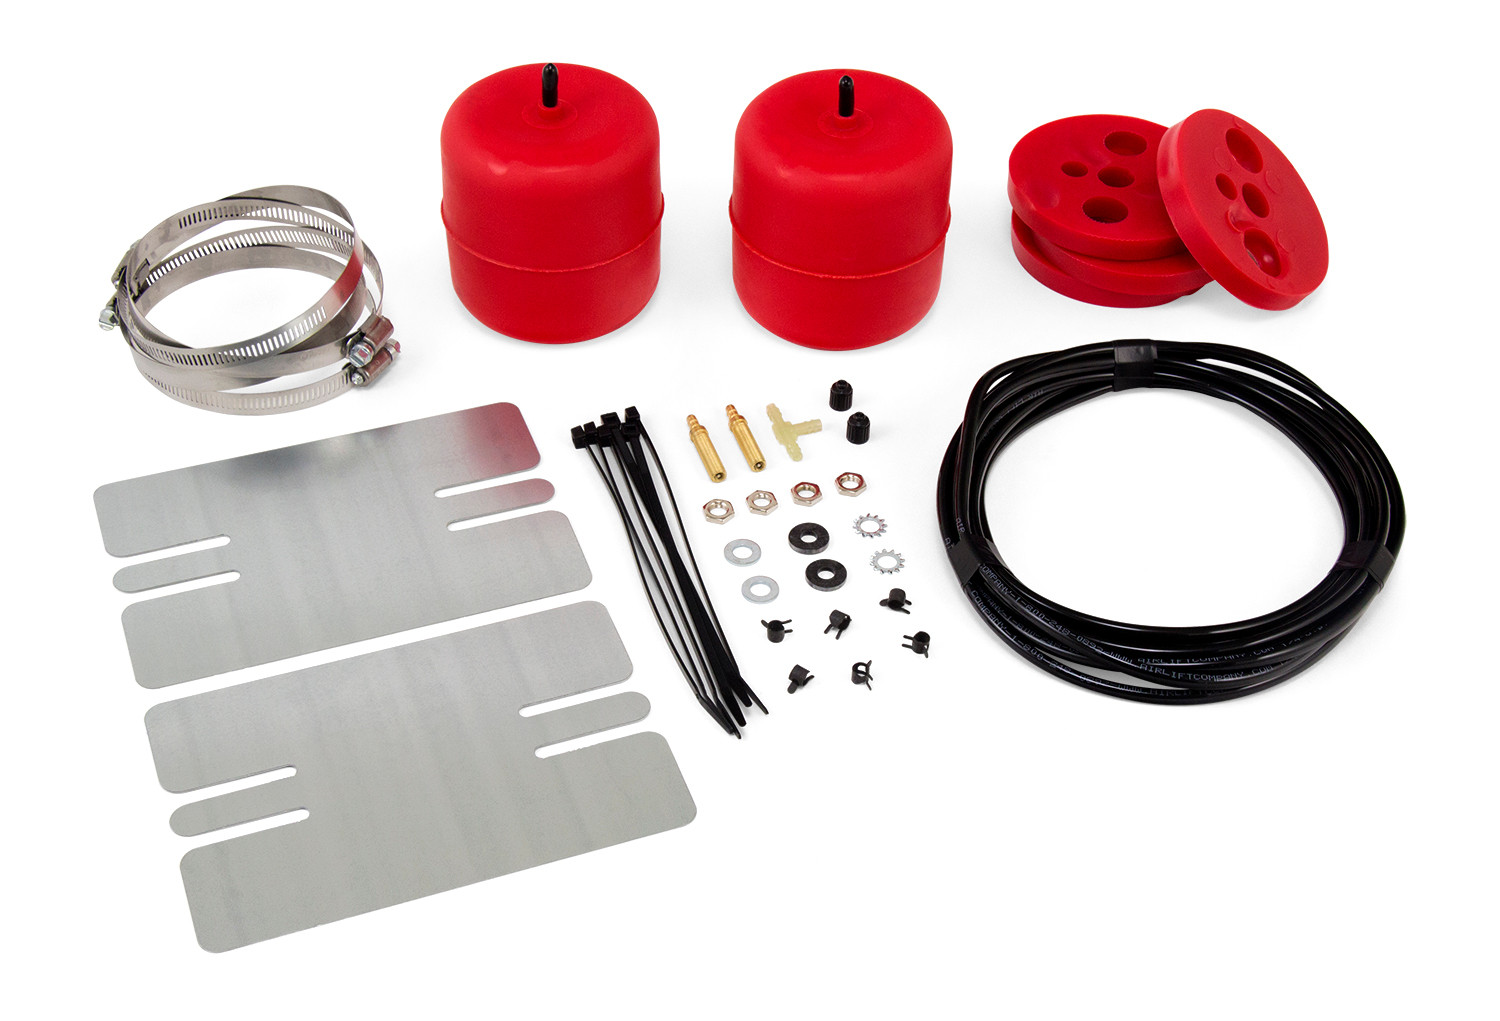
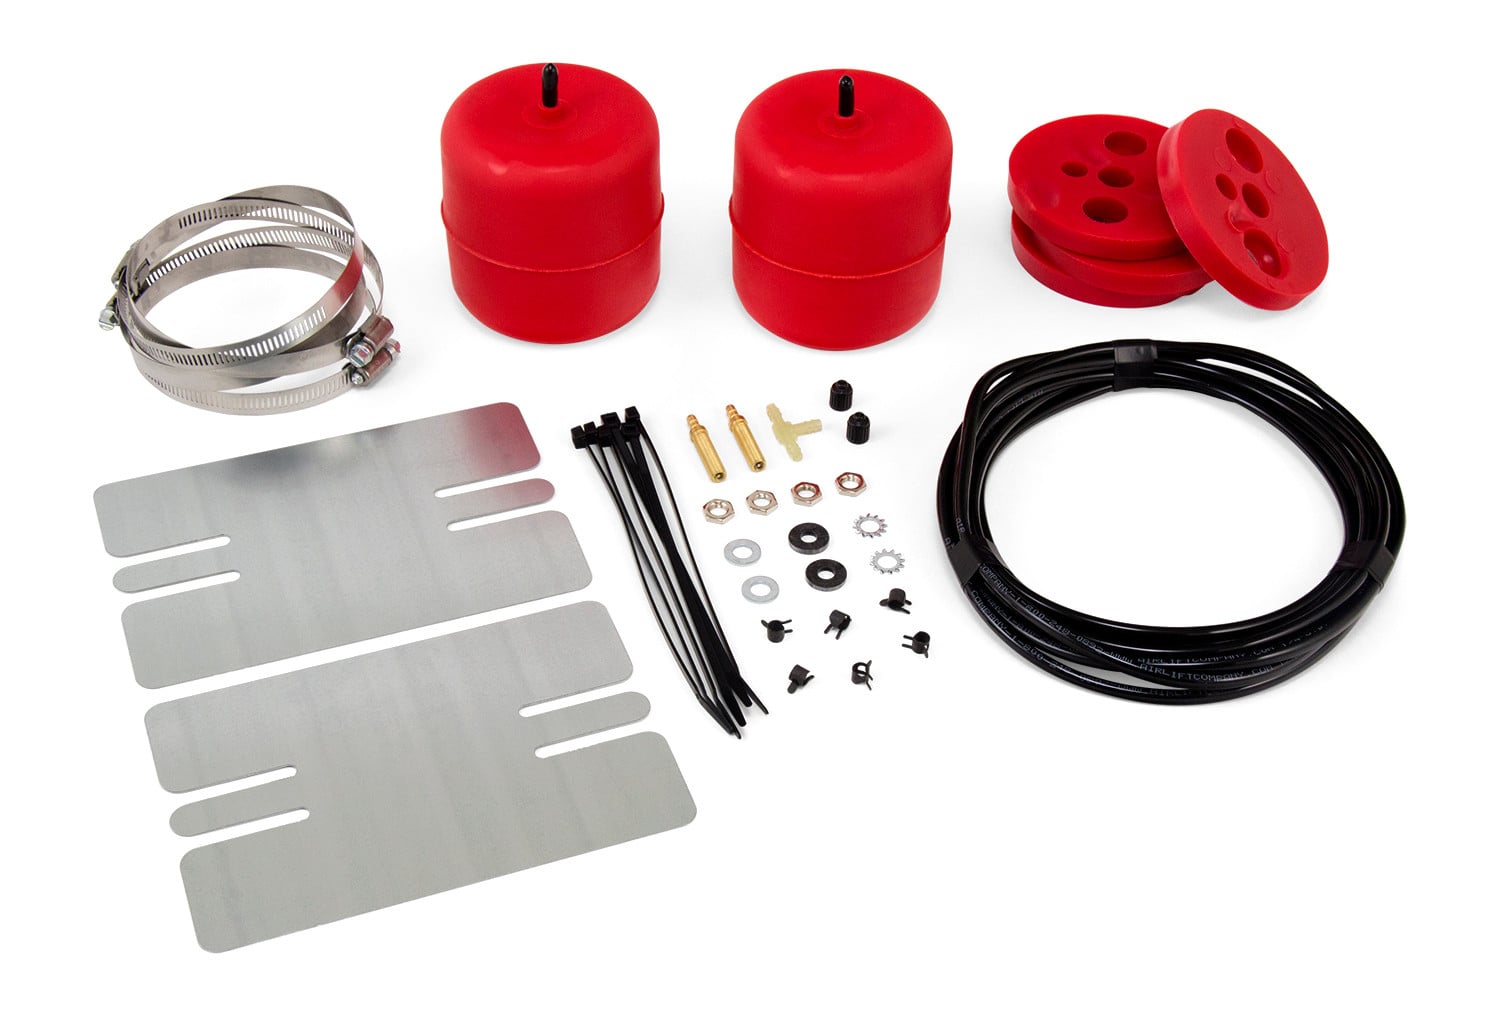
With the ability to fit almost any open coil spring, the Air Lift 1000 Universal kits from Air Lift are our most versatile ever. These kits provide your vehicle with up to 1000 lbs. of load-leveling support, making your ride smooth and comfortable. Air Lift 100 Universal springs aim to improve all aspects of your ride, eliminating squat, fixing poor headlight aim, and soaks up bumps, eliminating any sort of rough ride. Your coil-strung vehicle will drive smoothly and haul better than ever before with these kits installed. Finding the right kit for your vehicle is simple and as easy as 1-2-3. First, unload your vehicle and allow it to return to normal ride height. Then, measure the available inside height and available inside diameter of the vehicle's coil springs, finding the available height and width inside the springs. Finally, check out the chart provided by Air Lift and match your measurements with the corresponding kit numbers. Each Air Lift 1000 Universal Air Spring kit comes fully equipped with every part needed for a full installation. This includes two Air Lift 1000 air springs, made from durable, molded polyurethane, and two heat shields, with clamps. The kit also contains air line, tee, zip ties, two Schrader values, air spring spacers (if applicable), and, of course, detailed installation guides with advice for proper installation. Of course, all of our kits also come with Air Lift's 60-day, no questions asked, money-back guarantee. As the leader in air suspension products for over 70 years, Air Lift is committed to delivering quality parts that last. To insure the highest quality, longevity, and customer satisfaction, the key components and air springs have all been rigorously tested. With a limited lifetime, unlimited-mileage warranty -- not to mention the Air Lift reputation for great customer service and technical support -- you can purchase this kit with peace of mind.
Air Lift Company has developed dependable air spring suspension products since our inception in 1949. Our original product, a rubber air spring inserted into a car’s factory coil spring, was created and patented in 1950. We’ve come a long way since 1949 and are proud to be a dedicated suspension specialist company.
Today, Air Lift load support products are sold worldwide and are engineered to fit over 540 vehicles. Our extensive product line offers air helper springs for trucks, RVs, SUVs, CUVs, and vans, as well as the most technologically advanced on-board air compressor systems for on-the-go air spring control.
Air Lift leads the industry in no-drill applications – kits that bolt onto your vehicle’s frame, speeding the installation process. Our teams work constantly to bring innovative products to you and upgrade existing products with the latest technology.
All of our efforts are spent ensuring your safety and comfort by designing, engineering, and manufacturing the highest quality suspension products. We are a family-owned business based in Lansing, Michigan, and make your family and cargo’s safety our top priority.
Experts available to answer your questions
Call 888-634-9494Limited Lifetime
The Air Lift 1000 is a universal air spring kit that installs inside coil springs to provide load support and suspension leveling. It uses inflatable air cylinders that sit within the coil springs and help support the vehicle's weight by expanding and pushing the coils apart. The kit is designed for vehicles with shock absorbers rather than struts.
The Air Lift 1000 Universal kit fits vehicles with shock absorbers rather than struts, including solid axle, independent and front applications. It will not fit vehicles with coil-over shocks or coil springs with internal jounce bumpers. To determine fitment, you must measure the inside diameter of your coil springs and the distance from upper to lower spring seats. If your vehicle is lifted, check if Air Lift Company has an existing kit for your specific application first.
No. The Air Lift 1000 Universal kit will not fit vehicles with coil-over shocks or coil springs with internal jounce bumpers. This kit is designed only for vehicles with shock absorbers and traditional coil springs.
If your vehicle is lifted, check to see if Air Lift Company has an existing kit designed for your specific lifted application first, and follow the manual installation instructions for that stock kit. Note the size of the cylinder in the stock kit and compare it to what is needed for your lifted application. The universal kit may not be appropriate for all lifted vehicles.
Required tools include: flat tire spoon, pliers, sharp knife or scissors, safety glasses, 5/16" drill bit (very sharp), heavy-duty drill, hoist or floor jack, two jack stands, and a spray bottle with dish soap/water solution. The soap solution is used to test for air leaks by applying it to valve cores, fittings and connections.
The kit includes air spring cylinders, spacers (thickness varies by kit model), air line with clamps, a tee fitting (for tee air line routing) or dual air lines, inflation valve(s), and a heat shield for the exhaust (in most universal kits). Specific hardware varies by kit number (60900–60927). Refer to the Hardware List on page 3 of the manual for your specific kit's contents.
Measure on an unladen vehicle or jack it to stock height. First, measure the inside diameter of a middle coil (not top or bottom if they are reduced in size). Second, measure from the upper spring seat to the lower spring seat—this is the required air spring height. The air spring cylinder works by inflating and bulging between the coils to push them apart, so it does not need to fit the inside diameter exactly; a slightly undersized cylinder is recommended. Do not use a cylinder with a larger outside diameter in a smaller ID spring, as this causes early failure.
Spacers are used to make up the difference in length if the air spring cylinder is slightly shorter than required. They also serve as protectors if there is a sharp object at the top or bottom spring seat that could cut the air bag. Spacer thickness varies by kit: some kits include 0.25" and 0.50" spacers, while others include 0.50" spacers. The spacer can be inserted facing either direction and may need to be positioned on the hose side of the cylinder depending on the application.
The manual does not specify whether battery disconnection is required. Contact Air Lift Company at (800) 248-0892 for clarification on this step.
Jack up the front or rear of the vehicle or raise it on a hoist. Support the frame or axle with safety stands. Lower the axle or raise the body until the suspension is fully extended. Observe tension on brake lines and do not strain them. In some cases, you may need to unbolt the sway bar to obtain additional clearance between the coils.
Remove the plastic cap from the barbed stem on the end of the air spring. Exhaust the air from the air spring by rolling it up toward the barbed stem. Replace the cap on the stem to hold the flat shape. Fold the air spring into a hot dog bun shape before inserting it into the coil spring.
Insert the flattened (hot dog bun-shaped) air spring into the side of the coil spring through the lowest opening, with the stem pointing in the direction established for the hose routing. Push the air spring up or down within the coil by hand or with a blunt instrument such as a spoon-type tire iron. When the air spring is completely within the coil, remove the cap and allow it to assume its as-molded shape. If used, insert the spacer at the top or bottom.
Yes. You must drill a 5/16" hole for the inflation valve in the location you select (gas cap well, trunk, rear bumper, fender flange or behind license plate). Additionally, if there is not an existing hole or easy access for the air line to exit the spring seat, you may need to drill or grind a hole in the lower or upper spring seat. Typically, a 9/16" to 3/4" diameter hole is used for hose access. This hole may need to be offset from center based on suspension articulation, particularly in independent suspensions.
Use a sharp utility knife to cut the air line. A clean, square cut will ensure against leaks. Do not use wire cutters or scissors, as these tools may flatten or crimp the air line, causing it to leak around the O-ring seal inside the elbow fitting.
Use a 5/16" drill bit (very sharp) to drill the hole for the inflation valve. The rubber washer serves as an outside weather seal.
Tee air line routing uses a single tee fitting to connect both left and right air springs to one inflation valve. This is recommended unless the weight in the vehicle varies from one side to the other and unequal pressures are needed to level the load or compensate for axle torque transfer in racing applications. Dual air line routing uses separate air lines and separate inflation valves for each side, allowing independent pressure adjustment on each side.
Slide an air line clamp onto the air line. Push the air line over the barbed stem, covering all the barbs. Using pliers, compress the ears on the air line clamp and slide it forward until it fully covers the barbed section. Use a soapy water solution to lubricate the fittings on the air cylinders and tee (if used) before installing the hose.
Route the air line along the cross member and either the lower control arm or the upper spring seat to the air spring. Keep the hose at least 12" away from any heat source and maintain at least 8" clearance from the exhaust system to prevent melting. Leave sufficient slack in the hose so it can move when the suspension is in motion. Do not route the hose through any holes in the frame or near sharp objects. Wire-tie the hose to existing harnesses or frame/component parts along the routing to the tee, inflation valve or valves. Cap the inflation valve with the supplied cap to keep contaminants out of the core.
Select a location for the inflation valve in the gas cap well, the trunk, rear bumper, fender flange or behind license plate, ensuring that the valve will be protected and accessible with an air hose. Drill a 5/16" hole and mount the valve with the rubber washer serving as an outside weather seal.
No. Installing air springs will not change the weight ratings (GAWR, GCWR and/or GVWR) of a vehicle. The installation does not alter the Gross Vehicle Weight Rating or payload. You must not exceed the maximum load listed in your vehicle's owner's manual or the Safety Compliance Certification Label. Exceeding the GVWR is dangerous and voids the Air Lift warranty.
The minimum air pressure is 5 PSI. This minimum pressure must be maintained at all times to keep the air spring in shape and ensure it moves throughout its travel without rubbing or wearing on itself. Failure to maintain the correct minimum pressure will void the warranty.
Maximum air pressure depends on the pitch (gap between coils) of your coil spring. If the spring pitch is 1 inch or greater, the maximum is 35 PSI. If the spring pitch is less than 1 inch, the maximum is 50 PSI. Never inflate beyond these limits. Pressure may be varied within the specified range depending on the load.
Measure the pitch (gap or distance between coils) of your stock coil spring. Some springs have a variable rate in which the gap varies. For variable-rate springs, measure the largest opening and use this as the guide. If the pitch is 1 inch or greater, use up to 35 PSI maximum. If the pitch is less than 1 inch, use up to 50 PSI maximum. The minimum is always 5 PSI. Pressure may be varied within the specified range depending on the load.
Maintain at least 6" clearance between air springs and air lines and any heat sources. Maintain at least 8" clearance from the exhaust system to the air line to prevent the hose from melting. Ensure at least 2-3" clearance between the tailpipe and the air spring. If the exhaust is less than 3" away from the coil spring, install the heat shield (if provided in the kit) between the exhaust and the coil spring.
The heat shield protects the air spring from heat damage. Most universal kits come with a heat shield for the exhaust. If the exhaust is less than 3" away from the coil spring, it is necessary to install the heat shield between the exhaust and the coil spring. Refer to the instruction manual in the heat shield kit for installation instructions.
Complete the post-installation checklist: (1) Clearance test—inflate to 30 PSI and ensure at least 1/2" clearance around each bellow away from tires, brake drums, frame, shock absorbers and brake cables. (2) Leak test—inflate to 30 PSI and check all connections with soapy water solution; all leaks must be eliminated before road testing. (3) Heat test—ensure at least 6" clearance from heat sources; install heat shield if required. (4) Fastener test—recheck all bolts for proper torque and re-torque after 100 miles. (5) Road test—drive 10 miles and recheck for clearance, loose fasteners and air leaks.
Inflate the air springs to 30 PSI. Apply a liquid solution of 1/5 dish soap to 4/5 water to all valve cores, fittings and connections. Look for bubbles, which indicate leaks. All leaks must be eliminated before the vehicle is road tested. After initial installation, recheck air pressure after 24 hours; a 2-4 PSI loss is normal. If pressure has dropped more than 5 PSI, retest for leaks.
Recheck air pressure after 24 hours. A 2-4 PSI loss after initial installation is normal. If pressure has dropped more than 5 PSI, retest for leaks. Additionally, recheck the air spring system after 30 days or 500 miles, whichever comes first. If any part shows signs of rubbing or abrasion, identify and move the source if possible, or remount the air spring.
Check the air pressure weekly. Always maintain normal ride height. Never inflate beyond 35 PSI (if spring pitch is 1" or greater) or 50 PSI (if spring pitch is less than 1"). When increasing load, always adjust the air pressure to maintain normal ride height.
If the air springs are properly installed and maintained, they can last indefinitely. Proper maintenance includes checking air pressure weekly, maintaining minimum 5 PSI pressure at all times, not exceeding maximum pressure limits, and adjusting pressure to maintain normal ride height.
No. Air pressure can be adjusted with any type of compressor as long as it can produce sufficient pressure to service the springs. Even a bicycle tire pump can be used, though it requires significant effort. Although not required, Air Lift recommends installing one of its air management systems to control the air springs. The control system allows the operator to adjust the air springs on the fly to help improve ride and handling.
Yes, the vehicle can be lifted on a hoist for short-term service work such as tire rotation or oil changes. However, if the vehicle will be on the hoist for a prolonged period of time, support the axle with jack stands to take the tension off the air springs. Use of on-board leveling systems does not require deflation or disconnection.
Use a soapy water solution to check all air line connections and the inflation valve core before deflating and removing the spring. If you find a leak, identify the source and fix it. Common causes include pinched air lines (loosen or replace tie straps), holes or cracks in the air line (replace as needed), or kinks or folds in the air line (reroute as needed). If the preceding steps do not solve the problem, the air spring may have failed due to a factory defect or operating problem. Call Air Lift at (800) 248-0892 for assistance.
When increasing load, always adjust the air pressure to maintain normal ride height. Increase or decrease pressure from the system as necessary to attain normal ride height for optimal ride and handling. Remember that loads carried behind the axle (including tongue loads) require more leveling force (pressure) than those carried directly over the axle. Air Lift Company recommends a 2 PSI increase above normal tire inflation pressure for each 100 lbs additional load on the axle.
If it becomes necessary to raise the vehicle by the frame, make sure the system is at a minimum pressure of 5 PSI to reduce tension on the suspension and brake components. Use of on-board leveling systems does not require deflation or disconnection.
If the vehicle's headlights are shining into the trees or the vehicle is leaning to one side, it is not level. Raise the air pressure to correct either of these problems and level the vehicle. Start with the vehicle sitting on level ground and add air in small quantities, checking the pressure frequently.
If the vehicle has a rough or harsh ride, it may be due to either too much pressure or not enough. Try different pressures to determine the best ride comfort. Adjust the pressure up and down to find the best ride. If the vehicle rocks and rolls, adjust the air pressure to reduce movement.
If the front of the vehicle dives while braking, increase the pressure in the front air bags, if equipped. This will improve stability and reduce the diving motion.
If it is suspected that the air bags have bottomed out, increase the pressure. Bottoming out occurs when the air spring is compressed to its limit and no longer provides support. Increasing pressure will prevent this condition.
It may be necessary to maintain different pressures on each side of the vehicle. Loads such as water, fuel, and appliances will cause the vehicle to be heavier on one side. Adjust the pressure on each side independently to level the vehicle. This may require dual air lines and separate inflation valves for each side.
No. The Air Lift 1000 is designed only for vehicles with shock absorbers and traditional coil springs, not coil-over shocks or coil springs with internal jounce bumpers.
You need a heavy-duty drill, hoist or floor jack, two jack stands, a 5/16" drill bit, pliers, a sharp utility knife, and a spray bottle with soapy water solution for leak testing.
Yes. You must drill a 5/16" hole for the inflation valve. You may also need to drill or grind a 9/16" to 3/4" hole in the spring seat for air line access if no existing hole is available.
Use a sharp utility knife to make a clean, square cut. Do not use wire cutters or scissors, as they flatten or crimp the air line and cause leaks around the O-ring seal.
Maintain a minimum of 5 PSI at all times. Failure to maintain this pressure will cause premature air bag failure and void the warranty.
No. The Air Lift 1000 does not alter your vehicle's GVWR or payload. You must not exceed the maximum load specified in your vehicle's owner's manual.
Inflate to 30 PSI and apply a soapy water solution (1 part dish soap to 4 parts water) to all valve cores, fittings and connections. Bubbles indicate leaks. All leaks must be fixed before road testing.
Check air pressure weekly. Recheck after 24 hours of initial installation (2-4 PSI loss is normal; more than 5 PSI indicates a leak). Recheck after 30 days or 500 miles.
There is a leak that must be fixed. Use a soapy water solution to check all air line connections and the inflation valve core. Look for bubbles to identify the leak source. Common causes include pinched air lines (loosen or replace tie straps), holes or cracks in the air line (replace as needed), or kinks in the air line (reroute as needed). If you cannot locate the leak, the air spring may have failed. Call Air Lift at (800) 248-0892 for assistance.
The air line may have been cut with wire cutters or scissors instead of a sharp utility knife, which flattens or crimps the line and causes leaks around the O-ring seal. Alternatively, the air line clamp may not fully cover the barbed section. Ensure the air line is cut with a sharp utility knife and that the clamp is fully compressed over the barbs using pliers.
Reroute the air line to remove the kink or fold. Ensure the hose has sufficient slack to move when the suspension is in motion and is not routed through holes in the frame or near sharp objects. Wire-tie the hose to existing harnesses or frame/component parts along the routing.
Loosen or replace the tie straps that are holding the air line. Ensure the hose has sufficient slack to move when the suspension is in motion and is not strained by the fasteners.
On Sale Today
Original price was $206.99. Current price is $149.99.You save $57.00 (28%)
Free Shipping
Ships free on all orders
 Authorized Dealer

Quick Ship
In stock and ready to ship — order now!
FREE ShippingFREE SHIPPING
Estimated delivery Sat, Sep 26 - Tue, Sep 29
Order before 2 PM EST Monday–Friday for same-day processing
Guaranteed safe & secure checkout
No reviews have been added for this product.