

BlueOx Tow Bar Base Plate, Front Mount, RV Flat Towing for Select, MERCURY TRACER E13Blue OxOriginal price was $699.99. Current price is $639.00.Out of Stock
View productOur in-house experts typically reply within one business day.

Blue Ox
Verify Fitment
Select your vehicle to confirm this part fits.
1995 - 1997 Mercury Grand Marquis
Confirmed to Fit


Always the correct part
We know our products
Quality Products
Free Shipping!
Always the correct part
We know our products
Quality Products
Free Shipping!

High-quality Material: Crafted from premium-grade steel, the Blue Ox BX2120 Tow Bar Bracket ensures lasting durability and optimum strength.
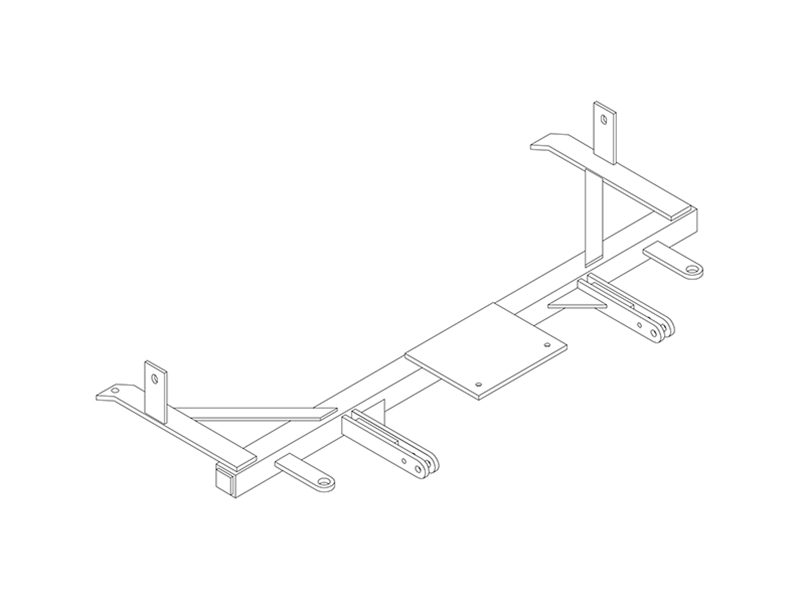
Material: Steel
Color: Black
Finish: Powder Coat
Mounting Type: Bolt On
Mounting Hardware Included Yes/No: Yes
Enhance your towing experience with the robust and custom-designed Blue Ox BX2120 Tow Bar Bracket. Made from premium-grade steel, it is precision-engineered to fit a wide range of towed vehicles, ensuring a flawless fit and top-notch performance. Its black powder-coat finish not only adds to its visual appeal but also provides superior resistance against corrosion and wear. The bolt-on mounting type ensures easy and secure installation. Plus, every Blue Ox base plate comes with all the necessary hardware and comprehensive instructions for a hassle-free, do-it-yourself installation.

Blue Ox is known internationally for recreational and commercial towing products, manufacturing in Pender, Nebraska since 1925. The line covers tow bars and vehicle-specific baseplates for flat towing behind a motorhome, sway control and weight distributing hitches, supplemental braking accessories and towing wiring, backed by patented designs and long-standing customer service.
Blue Ox has manufactured since 1925 and is recognised internationally for towing products and customer service. The company operates from Pender, Nebraska, where it grew out of Automatic Manufacturing Co., a business that started with cattle oilers and developed into agricultural equipment, tractor accessories and trailer towing hardware. That agricultural engineering heritage still shows in how the towing products are built, and the company holds patents across weight distribution, fifth wheel and tow bar designs.
Flat towing is the discipline Blue Ox is best known for. Towing a car with all four wheels on the ground behind a motorhome demands a system that stays rigid under braking, articulates properly over uneven ground, and connects to the towed vehicle at points strong enough to take the load. Blue Ox tow bars handle the first two, with self-aligning arms that latch under tension and release without a struggle when the load is off them. Vehicle-specific baseplates handle the third, engineered per make and model to tie into structural mounting points behind the fascia.
The wider flat towing range covers supplemental braking systems, safety cables and the accessories that make a complete legal setup, along with baseplate wiring and dinghy towing harnesses that pass lighting signals to the towed vehicle without back-feeding its electrical system.
For conventional trailer towing, Blue Ox weight distributing hitches with integrated sway control transfer tongue load onto the tow vehicle's front axle and resist the yaw that crosswinds and passing trucks induce.
The company describes its foundation as customer service, designing around what owners actually ask for, and it runs an RV park adjacent to the factory where customers can stay. Sister operations at the same Nebraska site include Automatic grain roller mills and MAD-RAMPS pivoting ramp systems.
Experts available to answer your questions
Call 888-634-94943 Years
1 compatible vehicles
| Year | Make & Model | Notes |
|---|---|---|
| 1995 - 1997 | Mercury Grand Marquis | Comes with Standard Attachment Tabs Install Rating 4 Bumper Fascia Must Be Removed/Replaced During Install Minor Drilling Required |
Yes, the BX2120 baseplate is designed specifically for the 1995 Mercury Grand Marquis. However, you must use it only with a tow bar approved by Automatic Equipment Mfg. Co., or the limited warranty will be invalidated.
The BX2120 package includes: one baseplate weldment (61-4678), two nut plates (61-3799), two spacer tubes (107-1941), two 1/2-13 x 2 hex bolts grade 5 (201-0283), two 12mm-1.75 x 80mm hex bolts grade 8.8 (201-0591), two 3/8-16 x 2 hex bolts grade 5 (201-0444), two 1/2 lock washers (203-0012), two 3/8-16 hex whiz nuts (202-0071), and six bolts to attach the baseplate to the car. The package also includes a General Instruction Sheet.
Required tools are: 8mm socket, 11mm socket, 15mm wrench, 18mm socket, 19mm wrench, 3/4" socket, 9/16" wrench, 9/16" socket, 13/32" drill bit, 17/32" drill bit, flat screwdriver, Phillips screwdriver, Loctite Blue, and tape measure. A long socket extension is also needed to access the horizontal bolt behind the bumper.
Yes, the front bumper must be removed. This requires removing the belly pan, radiator cover, parking lights, turn lights, and multiple fasteners from the bumper and frame. An assistant is needed to help pull the bumper forward during removal.
Yes, an assistant is required. They will need to help hold the baseplate in position during installation (Step 11) and pull lightly forward on the bumper during removal (Step 8).
Yes, drilling is required. You must drill out smaller holes in the aluminum bumper with a 13/32" bit (Step 10) and drill holes through each frame rail with a 17/32" bit (Step 15). These are permanent modifications to the vehicle.
The aluminum bumper has two existing 1-inch diameter holes that are 7 inches apart. Above these, there are smaller holes that must be drilled out with a 13/32" drill bit (Step 10).
You must drill holes through each frame rail with a 17/32" drill bit. These holes are for the rear support bolts (Step 15).
1. Remove belly pan and radiator cover. 2. Remove parking lights and turn lights. 3. Remove bumper fasteners and pull bumper forward. 4. Remove frame rail bolts. 5. Drill bumper holes (13/32") and install baseplate upper mounts with 12mm x 80mm bolts (do not tighten yet). 6. Install spacer tubes and 3/8 x 2 bolts through bumper holes and tighten. 7. Snug upper mount bolts, reposition bumper to original location, and fully tighten. 8. Drill frame rail holes (17/32") and install rear support bolts with nut plates. 9. Reinstall bumper, lights, radiator cover, and belly pan. 10. Install tow bar and safety cables.
The upper mounts should go outside of the frame rails. The 12mm x 80mm bolts are started into the upper mount slots and through the frame rails, then secured with the nuts removed from the frame rail in Step 9 (but not tightened yet).
The spacer tubes (part 107-1941) are inserted into the large 1-inch diameter holes in the bottom of the aluminum bumper. The 3/8 x 2 bolts pass through the baseplate, spacer, and bumper holes, then are secured with 3/8-16 hex whiz nuts.
After drilling 17/32" holes through each frame rail, insert the welded nut plate (61-3799) through the large slot above the 12mm bumper bolt. Bend the wire so the plate sits flat over the drilled hole. Apply Loctite to the threads of the 1/2 x 2 bolt and start it with a 1/2 lock washer into the nut plate. Fully tighten with a 3/4" socket. Repeat on the other side.
After snugging the upper mount bolts with a 19mm wrench and 18mm socket, use a tape measure to move the bumper back to its original position (you should have measured this location before removing the bumper in Step 8). Then fully tighten the bolts.
Loctite Blue must be applied to: the 12mm x 80mm upper mount bolts (Step 11), the 3/8 x 2 bolts that attach to the bumper (Step 13), and the 1/2 x 2 rear support bolts (Step 15).
The manual notes that dimensional variations between cars can be considerable. If a bolt does not clear, it may be necessary to file a hole slightly to allow the bolt to fit (Step 12).
After installation, reattach the turn lights and parking lights and check them to ensure they work. Verify that the plastic radiator cover and belly pan are secured with push pins and bolts. Install the tow bar and safety cables according to their instructions.
Do not substitute other devices if the tow bar pin and clip are lost. Contact the tow bar manufacturer or Automatic Equipment Mfg. Co. for replacement parts.
The BX2120 has a limited warranty. The warranty is invalidated if the baseplate is used with any tow bar not approved by Automatic Equipment Mfg. Co.
Yes, the BX2120 is designed for the 1995 Mercury Grand Marquis. Use only with tow bars approved by Automatic Equipment Mfg. Co.
You will need sockets (8mm, 11mm, 18mm, 3/4"), wrenches (15mm, 19mm, 9/16"), drill bits (13/32", 17/32"), screwdrivers (flat and Phillips), Loctite Blue, and a tape measure. A long socket extension is also needed.
Yes, the front bumper must be removed, along with the belly pan, radiator cover, parking lights, and turn lights. An assistant is required.
Yes, you must drill the aluminum bumper with a 13/32" bit and the frame rails with a 17/32" bit. These are permanent modifications.
Two 3/8-16 x 2 hex bolts (grade 5) are used with 3/8-16 hex whiz nuts. These are tightened with a 9/16" socket and wrench after applying Loctite Blue.
Two 12mm-1.75 x 80mm hex bolts (grade 8.8) are used with the nuts removed from the frame rail. Apply Loctite Blue before installation.
Two 1/2-13 x 2 hex bolts (grade 5) are used with 1/2 lock washers and nut plates. Tighten with a 3/4" socket after applying Loctite Blue.
On Sale Today
Original price was $699.99. Current price is $609.00.You save $90.99 (13%)
Free Shipping
Ships free on all orders
 Authorized Dealer



FREE ShippingFREE SHIPPING
Estimated delivery Fri, Oct 9 - Mon, Oct 12
Order before 2 PM EST Monday–Friday for same-day processing
Guaranteed safe & secure checkout
No reviews have been added for this product.