
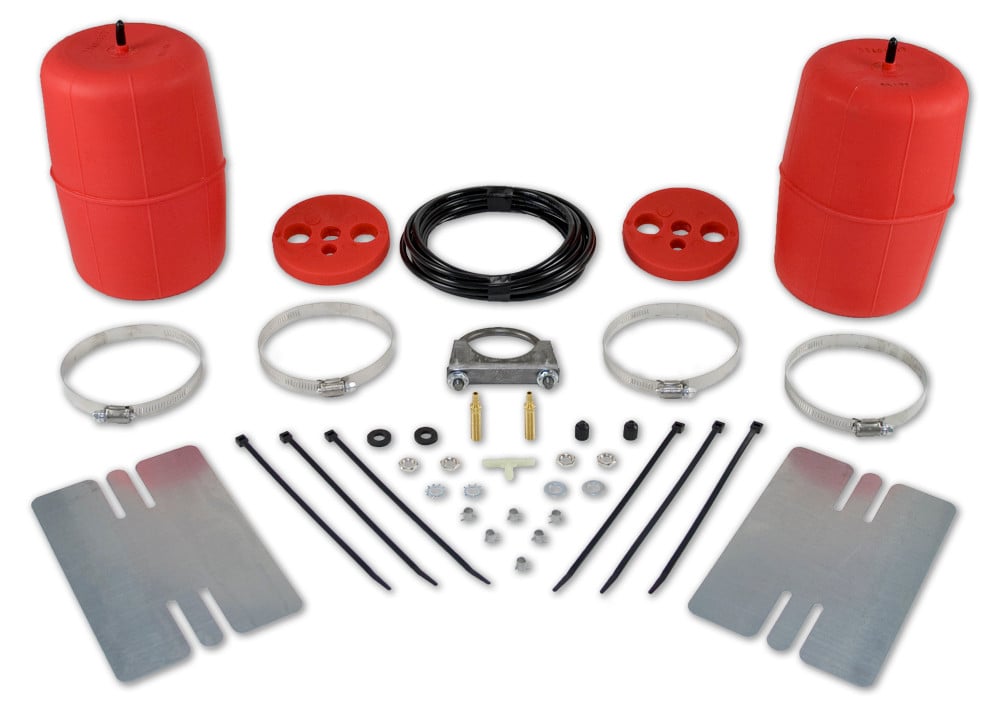
Air Lift AIR LIFT 1000 Load Leveling kit. 60742Air LiftOriginal price was $206.99. Current price is $149.99.In Stock
View productOur in-house experts typically reply within one business day.

Air Lift
Verify Fitment
Select your vehicle to confirm this part fits.


Always the correct part
We know our products
Quality Products
Free Shipping!
Always the correct part
We know our products
Quality Products
Free Shipping!
Providing up to 1,000 pounds of load-leveling capacity, Air Lift's air bag kits for SUV's and vans provide greater safety and comfort when you're carrying a heavy load.

Air Lift adjustable air helper springs level your load, and give your truck, van, or SUV a safer, more comfortable ride. Air springs are easy to install inside the existing coil spring with common mechanic's tools. Just add air when towing or hauling a heavy load, and reduce air pressure when unloaded, they are fully adjustable for a great ride. Air Lift air springs eliminate sag, sway, and bottoming out. They are made with rugged, durable components for long, reliable service. Air Lift 1000 kits fit many popular customer vehicles with coil springs. They're designed to: add support to rear springs on many popular SUVs, replace OEM front air springs on P-30 motor homes, provide front end support for snowplows, winches, etc., improve muscle car traction for drag racing, and improve ride and handling for full-size vans and trucks with front coil springs. Air adjustable with quick connecting, easy-to-use air fittings, Air Lift 1000 air helper springs have a typical max pressure of 35 PSI on cars and SUVs, and 90 PSI on motorhomes. They also have up to 1000 pounds of leveling capacity, right up to the manufacturer's recommended Gross Vehicle Weight Rating. Air Lift 1000 kits also come standard with a limited lifetime warranty and an exclusive 60 day ride satisfaction guarantee.
Air Lift Company has developed dependable air spring suspension products since our inception in 1949. Our original product, a rubber air spring inserted into a car’s factory coil spring, was created and patented in 1950. We’ve come a long way since 1949 and are proud to be a dedicated suspension specialist company.
Today, Air Lift load support products are sold worldwide and are engineered to fit over 540 vehicles. Our extensive product line offers air helper springs for trucks, RVs, SUVs, CUVs, and vans, as well as the most technologically advanced on-board air compressor systems for on-the-go air spring control.
Air Lift leads the industry in no-drill applications – kits that bolt onto your vehicle’s frame, speeding the installation process. Our teams work constantly to bring innovative products to you and upgrade existing products with the latest technology.
All of our efforts are spent ensuring your safety and comfort by designing, engineering, and manufacturing the highest quality suspension products. We are a family-owned business based in Lansing, Michigan, and make your family and cargo’s safety our top priority.
Experts available to answer your questions
Call 888-634-9494Limited Lifetime
1 compatible vehicles
| Year | Make & Model | Style | Notes |
|---|---|---|---|
| 2000 - 2007 | Ford Focus | Wagon | — |
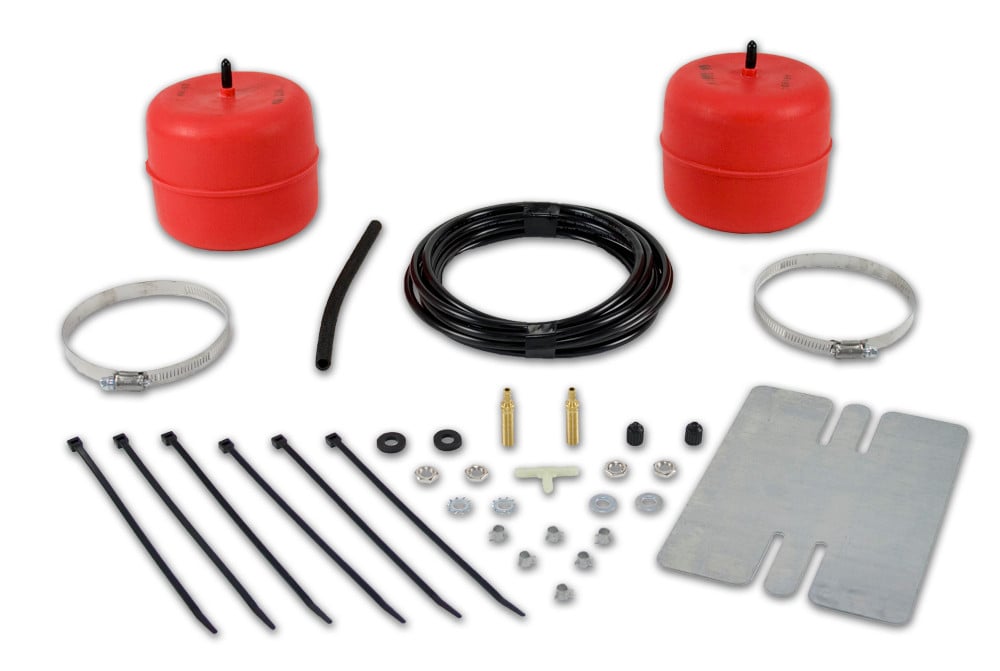
The MN-445 kit includes two 3" x 5" or 3" x 7" air cylinders (depending on kit number), two lower and two upper protectors, 15 feet of air line, two barbed valves, one barbed tee, six air line clamps, six straps, two poly caps, two rubber washers, two 5/16" lock washers, two 5/16" flat washers, and four hex nuts. You must choose between kit 60723 (3" x 5" cylinders) or kit 60724 (3" x 7" cylinders) at purchase.
The MN-445 is designed for vehicles with coil spring suspension and A-arm configuration. The air cylinders insert into the coil spring seat opening and the upper protector fits over the upper spring seat bolt on the A-arm.
Kit 60723 includes 3" x 5" air cylinders, while kit 60724 includes 3" x 7" air cylinders. Both kits are compatible with the MN-445 system. The choice between them depends on your vehicle's suspension geometry and desired load-leveling range. Consult the manufacturer or your installer to determine which is appropriate for your vehicle.
Required tools include a jack and safety stands to support the vehicle frame, a screwdriver (to help position the upper protector), a spoon-type tire iron or blunt instrument (to push the cylinder into the coil), pliers (to position air line clamps), and a drill with a 5/16" bit (to create the hole for the inflation valve). An air compressor is needed for inflation and leak testing.
Jack up the rear of the vehicle or raise it on a hoist. Support the frame with safety stands. Lower the axle or raise the body until the suspension is fully extended. This gives you access to the coil spring seat and A-arm for cylinder and protector installation.
With the tapered end of the upper protector pointing downward, insert it up through the bottom of the A-arm to the upper spring seat bolt. Push the protector over the bolt so it stays in place. A screwdriver can be used to pry the protector into position if needed.
Remove the plastic cap from the barbed stem on the cylinder end. Exhaust the air from the cylinder by rolling it toward the barbed stem. Replace the cap to hold the cylinder flat. Form the cylinder into a "hot dog bun" shape. If necessary, use string, tape, or wire to retain this shape during insertion into the coil spring seat.
Insert the formed air cylinder into the lower coil spring seat opening with the stem at the bottom. Push the cylinder up within the coil by hand or with a blunt instrument such as a spoon-type tire iron. Once fully inside the coil, remove the cap and allow the cylinder to assume its "as molded" shape.
After the cylinder is fully within the coil, push it to the top of the coil. Insert the lower protector between the lower open coils. Push the cylinder down so that the barb on the cylinder stem goes into the protector's open hole.
Air tee line installation is recommended for most vehicles. A single tee connects to both left and right cylinders with one inflation valve. Dual air lines are used only if weight in the vehicle varies from one side to the other and unequal pressures are needed to level the load. In that case, each side has its own inflation valve.
Locate the desired tee location on the frame rail or cross member. Determine and cut adequate air line length to reach from the tee to both left and right cylinders. Slide an air line clamp onto the air line. Push the air line over one side of the tee until all barbs are covered. Repeat for the other leg. With pliers, slide each air line clamp forward until it fully covers the barbed section.
Route the air line along the cross member and lower control arm to the air cylinder. Push the air line onto the stem of the air spring, covering all the barbs. With pliers, slide the air line clamp upward until it fully covers the barbed section.
Select a location for the inflation valve in the gas cap well, the truck bed, rear bumper, fender flange, or behind the license plate. The valve must be protected and accessible with an air hose. For dual air line systems, each valve location should be in the rocker panel flange or rear bumper.
Yes. You must drill a 5/16" hole at your chosen inflation valve location. The rubber washer provided is for outside weather sealing. Mount the valve as illustrated in the manual, with the rubber washer on the outside and the flat washer, lock washer, and hex nut on the inside.
Leave sufficient air line slack to prevent any strain on the fitting during axle motions. This is critical both when routing from the tee to the cylinders and when routing from the inflation valve to the tee or cylinders. Inadequate slack can cause air line damage or fitting failure as the suspension moves.
The air line must be kept at least 8 inches from the exhaust system to prevent the line from melting. This is a critical safety requirement during routing along the frame and control arms.
The tailpipe must be at least 2–3 inches from the air cylinder. After raising the axle or lowering the body until the air cylinders lightly touch the upper spring seat and lower spacers, check tailpipe clearance. If necessary, loosen clamps and rotate or move the air line routing to obtain additional clearance. If a heat shield is provided, install it.
Raise the axle or lower the body until the air cylinders lightly touch the upper spring seat and lower spacers. Check tailpipe clearance to ensure it is at least 2–3 inches from the air cylinders. If heat shields are provided, install them. Reattach shock absorbers if they were removed during installation. Do not inflate the air cylinders until you have read the Inflating the Air Springs section.
Inflate the cylinders to 25 lbs of air pressure for testing. Test for air leaks by applying a liquid solution of 1 part dish soap to 4 parts water to all valve cores, fittings, and connections.
After inflating to 25 lbs of air pressure, apply a liquid solution of 1 part dish soap to 4 parts water to all valve cores, fittings, and connections. Bubbles indicate a leak. If a leak is found, use the same soapy water solution to identify the source before removing the cylinder.
A 2–4 p.s.i. loss after initial installation is normal. Recheck air pressure after 24 hours. If pressure has dropped by more than 5 lbs, retest for leaks with the soapy water solution.
First, inflate the air springs to 20 p.s.i. before adding any payload. After the vehicle is loaded, adjust the air pressure down in 5 p.s.i. intervals to determine the best ride and handling. Lower the vehicle to the ground and test the suspension response at each pressure level.
The minimum air pressure is 5 p.s.i. Always maintain at least 5 p.s.i. to prevent chafing or coil pinch. Failure to maintain minimum pressure will void the warranty.
The maximum air pressure is 25 p.s.i. Do not exceed this pressure, as it may damage the air cylinders or fittings.
Check air pressure weekly. Regular pressure checks help identify slow leaks and ensure the system maintains proper ride height and handling.
Use a soapy water solution (1 part dish soap to 4 parts water) to check all air line connections and valve cores before removing the cylinder. Apply the solution to each connection and look for bubbles, which indicate a leak. Once you identify the source, you can tighten the connection or replace the fitting.
The MN-445 is designed for vehicles with coil spring suspension and A-arm configuration. Contact Air Lift technical support at 1-800-248-0892 ext. 2 to confirm fitment for your specific vehicle year, make, and model.
Yes. You must drill one 5/16" hole for the inflation valve. For dual air line systems, you will drill two 5/16" holes, one for each valve.
The manual does not specify whether the lower control arm must be removed. The air line is routed through the lower control arm, but the manual does not state that removal is required. Consult your installer or Air Lift technical support at 1-800-248-0892 ext. 2 for your specific vehicle.
Always maintain at least 5 p.s.i. to prevent chafing or coil pinch. Failure to maintain minimum pressure will void the warranty.
Check air pressure weekly to maintain proper system function and identify slow leaks early.
Inflate the air springs to 20 p.s.i. before adding any payload. After loading, adjust pressure down to level the vehicle for ride comfort.
Keep the air line at least 8 inches from the exhaust system to prevent melting.
Air loss can occur at valve cores, air line connections, the tee fitting, or the cylinder stems. Use a soapy water solution (1 part dish soap to 4 parts water) to test all connections. Bubbles indicate a leak. A 2–4 p.s.i. loss in the first 24 hours is normal, but loss exceeding 5 lbs indicates a leak that must be found and repaired. Tighten loose connections or replace damaged fittings.
If the cylinder does not assume its "as molded" shape after you remove the cap, it may not be fully inserted into the coil. Push it further up within the coil using a blunt instrument such as a spoon-type tire iron. Once fully inside, remove the cap and allow it to expand. If it still does not hold shape, the cylinder may be damaged; contact Air Lift technical support at 1-800-248-0892 ext. 2.
If tailpipe clearance is less than 2–3 inches from the air cylinder, loosen the air line clamps and rotate or move the air line routing to obtain additional clearance. If a heat shield is provided, install it to protect the air line from exhaust heat. Ensure the air line remains at least 8 inches from the exhaust system.
On Sale Today
Original price was $206.99. Current price is $149.99.You save $57.00 (28%)
Free Shipping
Ships free on all orders
 Authorized Dealer

FREE ShippingFREE SHIPPING
Estimated delivery Tue, Sep 22 - Fri, Sep 25
Order before 2 PM EST Monday–Friday for same-day processing
Guaranteed safe & secure checkout
No reviews have been added for this product.