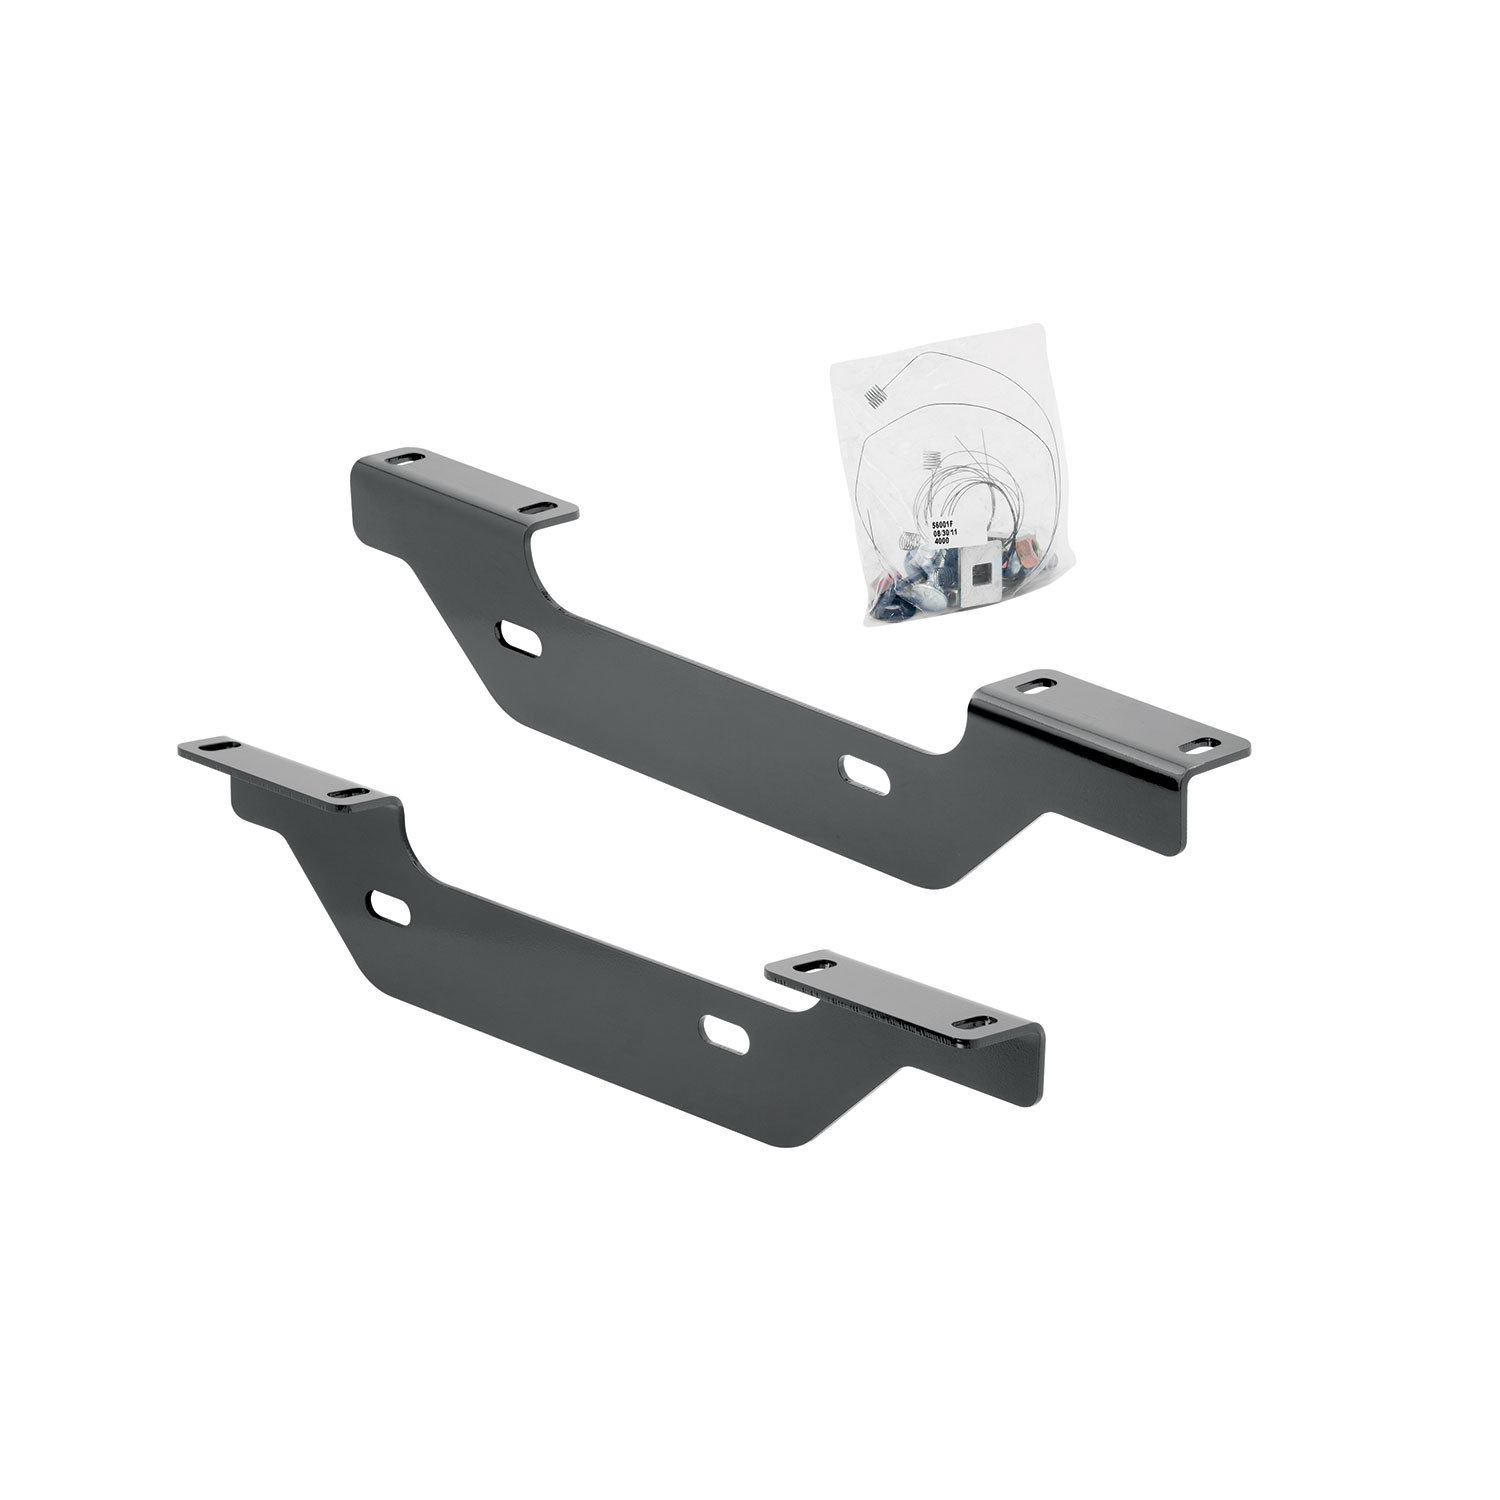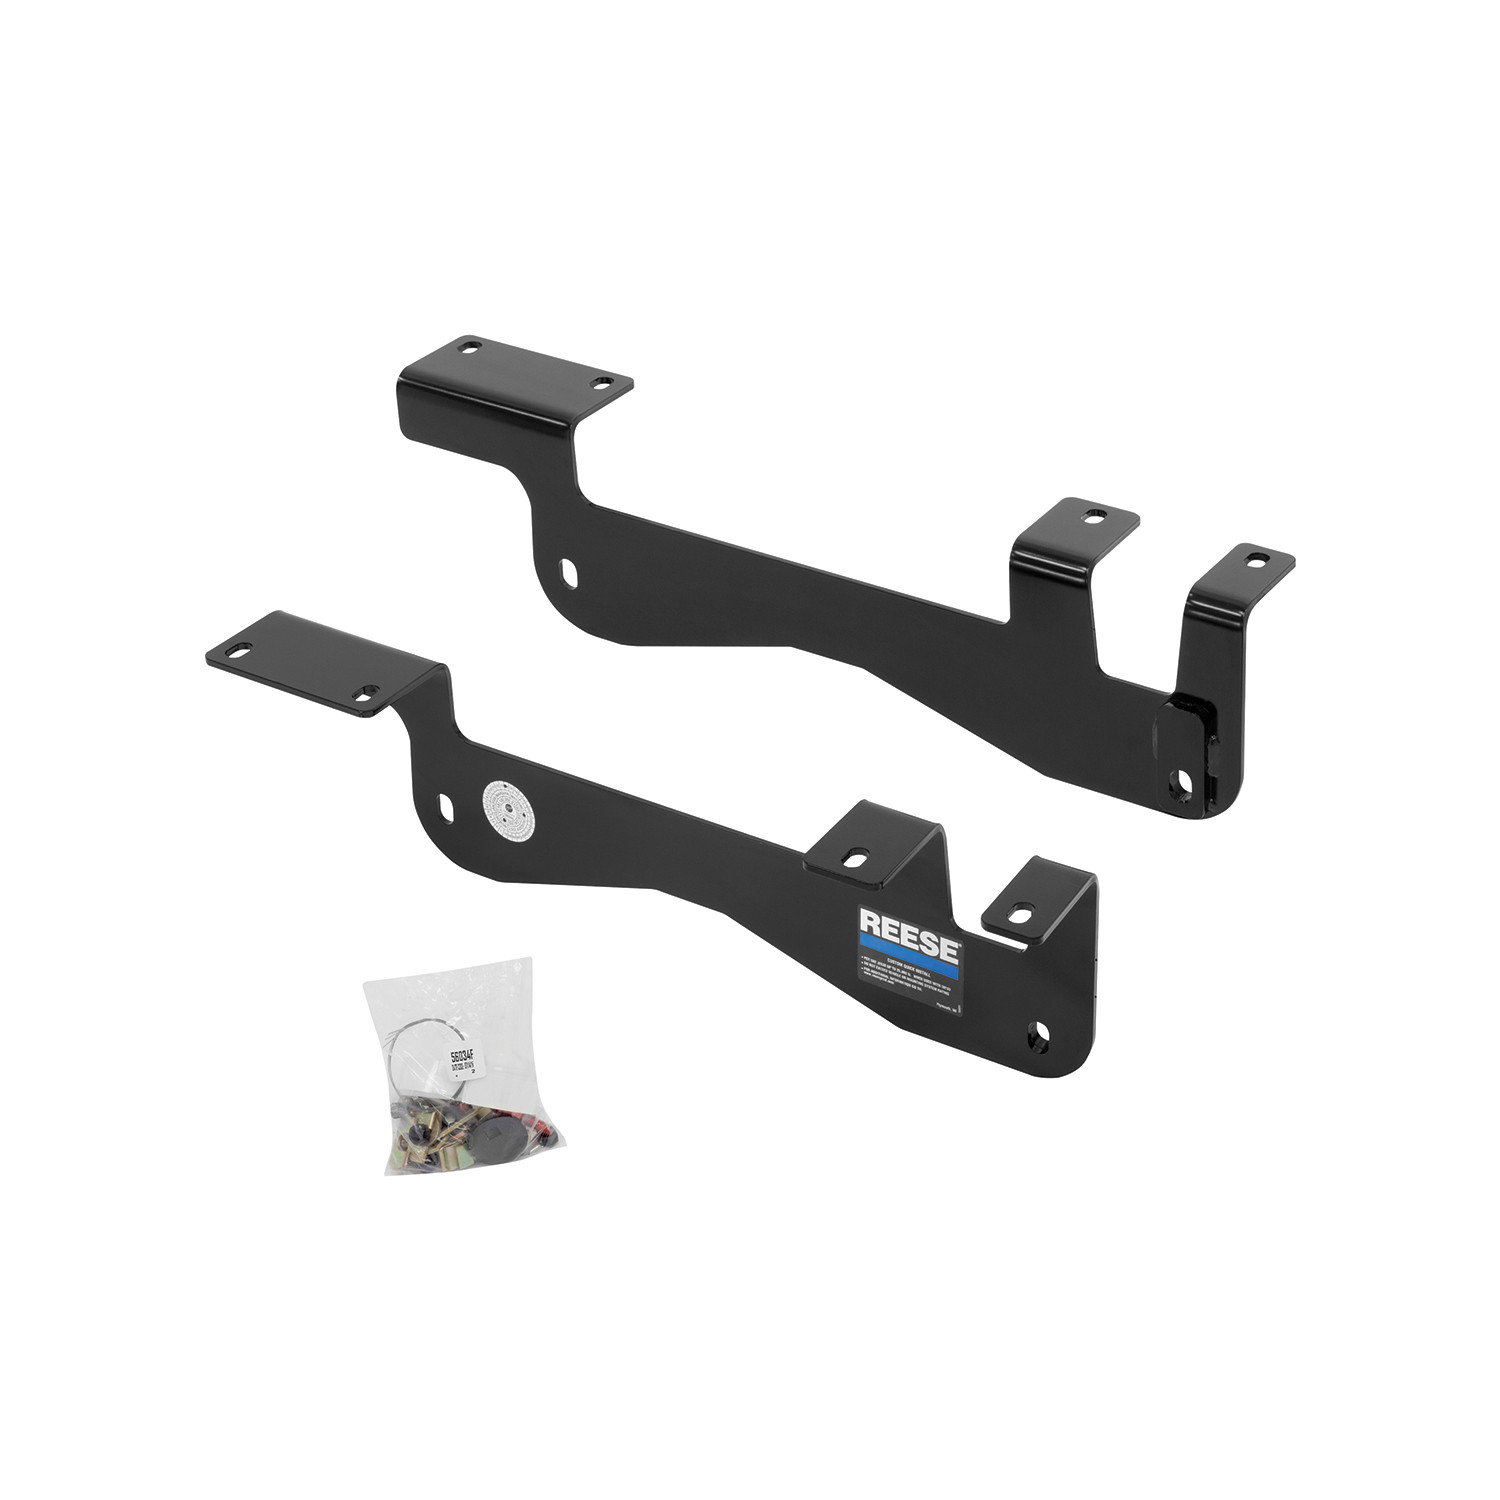

Reese Fifth Wheel Hitch Mounting System Custom Bracket, Outboard RE56023ReeseOriginal price was $421.25. Current price is $363.76.In Stock
View productOur in-house experts typically reply within one business day.

Reese
Verify Fitment
Select your vehicle to confirm this part fits.
2011 - 2016 Ford F-250 Super Duty
Confirmed to Fit
2011 - 2016 Ford F-350 Super Duty
Confirmed to Fit
2011 - 2016 Ford F-450 Super Duty
Confirmed to Fit


Always the correct part
We know our products
Quality Products
Free Shipping!
Always the correct part
We know our products
Quality Products
Free Shipping!

Want to take the family on a cross-country adventure? Or perhaps you're planning a shorter trip to your favorite campground. Whatever your destination, it's important to have the right equipment, especially when towing a fifth wheel trailer. To ensure proper hookup and safety while towing, you'll need something to attach your fifth wheel hitch in the bed on your truck. Many pickups come equipped with factory-installed rails or puck systems, but if you don't have one of these already installed, don't worry. REESE has an extensive line of mounting rails and bracket kits, custom-made to the exact specifications needed based on your truck's year, make, and model. REESE also offers several Industry Standard designs, as well as fastener kits, spacer kits, and a Power Puck mounting kit, so you can be sure you're covered, no matter what pickup you're using to tow. So make it easy. Make it fun. Make it REESE, so you can make the journey as enjoyable as the destination.
| BRAND: | REESE |
| PART NUMBER: | 56016 |
| WARRANTY: | LIMITED LIFETIME WARRANTY |
| WEIGHT: | 29.75 LBS |
| UNIVERSAL OR SPECIFIC FIT: | SPECIFIC |
| WELDING REQUIRED: | NO |
| MOUNTING HARDWARE INCLUDED: | YES |
| RAILS INCLUDED: | NO |
| DRILLING REQUIRED: | YES |
| MATERIAL: | STEEL |
| BOLT GRADE: | Grade 8 |
| LOCKABLE: | NO |
| COLOR: | BLACK |



Reese has designed towing equipment since 1952 and remains a benchmark for heavy-duty towing. The line covers fifth wheel hitches such as the modular M5, gooseneck couplers including the Goose Box, air-ride and short-bed pin boxes, weight distribution systems with active sway control, and the accessories that connect them, all built to exceed published industry standards.
Reese has been pioneering towing performance since 1952, when Margaret Reese asked her husband TJ to stop travel trailers rocking every time somebody walked through them. His answer, the first pair of stabilising jacks, was simple and effective enough to change the RV industry. From that starting point Reese grew into a designer and manufacturer of complete towing systems, and today it anchors the heavy-duty end of the Horizon Global towing portfolio.
Fifth wheel towing is where the brand's engineering is most visible. The M5 fifth wheel hitch uses a modular design that breaks into manageable sections for assembly, with a wider stance, tighter tolerances and a shock absorption system aimed at the jolts that travel up through a truck bed. For owners who would rather tow from a gooseneck coupler and keep the bed clear, the Goose Box 20K replaces the trailer's king pin with a gooseneck connection carrying its own air-ride cushioning.
Pin boxes are a Reese speciality. The 5th Airborne uses air-ride technology to dampen road shock and reduce the chucking motion that makes fifth wheel towing tiring, while the Sidewinder was designed for short-bed pickups, pivoting the connection point so the trailer can turn sharply without the front cap meeting the cab.
For conventional towing, Reese weight distribution systems restore load to the tow vehicle's front axle and control sway. The Pro Round Bar distributes weight evenly while damping sway, and the Pro Dual Cam II uses active cam-based sway control that works harder the stronger the sway force becomes. Complete kits pair bars, head and shank to a rated tongue weight, and dedicated sway control kits can be added to existing setups. The products suit RV owners, horse and livestock haulers and anyone towing near the upper end of a vehicle's rating.
Experts available to answer your questions
Call 888-634-9494Lifetime
3 compatible vehicles
| Year | Make & Model | Notes |
|---|---|---|
| 2011 - 2016 | Ford F-250 Super Duty | Fifth Wheel Trailer Hitch Brackets Uses all existing holes. No Drilling required Install Time is 0 minutes Outboard Brackets Except Cab & Chassis |
| 2011 - 2016 | Ford F-350 Super Duty | Fifth Wheel Trailer Hitch Brackets Uses all existing holes. No Drilling required Install Time is 0 minutes Outboard Brackets Except Cab & Chassis |
| 2011 - 2016 | Ford F-450 Super Duty | Fifth Wheel Trailer Hitch Brackets Uses all existing holes. No Drilling required Install Time is 0 minutes Outboard Brackets Except Cab & Chassis |
The Reese Fifth Wheel Hitch Mounting System Custom Bracket, Outboard RE56016 (Part #RE56016) fits the following vehicles: 2011-2016 Ford F-250 Super Duty; 2011-2016 Ford F-350 Super Duty; 2011-2016 Ford F-450 Super Duty. Always verify your specific year, make, and model before ordering.
The Reese Fifth Wheel Hitch Mounting System Custom Bracket, Outboard RE56016 (Part #RE56016) fits 2011-2016 Ford F-250 Super Duty models. The 2016 model year is the last year covered by this part number. For newer models, check for an updated version.
Yes, the Reese Fifth Wheel Hitch Mounting System Custom Bracket, Outboard RE56016 (Part #RE56016) is designed to fit the 2011-2016 Ford F-250 Super Duty.
The Reese Fifth Wheel Hitch Mounting System Custom Bracket, Outboard RE56016 (Part #RE56016) Refer to the included instructions for installation details. Basic hand tools are typically all you need.
Yes, the 56016 kit is designed for Ford Super Duty F-250, F-350, and F-450 models. However, it is for use with REESE® 30153 rails only. Before purchasing, visit www.ReeseProducts.com to verify that your specific truck year and configuration are supported and that you have the most recent revision of the installation instructions.
No. Plastic bed liners must be cut out of the way to provide metal-to-metal contact between the mounting rails and the truck bed. However, the mounting rails may be installed on spray-in bed liners. If using a spray-in liner, consult your installer for the recommended curing time before installation.
The kit includes fastener kit 56016F with all bolts, nuts, and washers needed. You will need wrenches in sizes 3/4", 7/8", 15/16", 15 mm, and 18 mm; drill bits 1/8" and 9/16"; a center punch; and a measuring tape. All fasteners supplied are Grade 8 unless otherwise specified.
Removing the spare tire is optional. The manual states to lower and remove the spare tire only if extra room is needed during installation. This is the first step but is not mandatory for all installations.
Yes. On gas engine vehicles only, the vapor tube running along the inside of the driver's side frame rail must be relocated before installing the driver's side bracket. Remove the existing flange nut from the outside of the frame, rotate the tubes up and out of the way, and install the L-bracket (item 8) using 1/4" hardware (items 5, 6, 7). Leave the tube holder loose during bracket installation, then tighten it with the factory flange nut after final torquing. This procedure is not required for diesel engines.
Yes, drilling is required. You must drill pilot holes at 1/8" diameter, then enlarge them to 9/16" diameter. When drilling, be aware of potential risks to vehicle components such as brake lines and fuel tanks, and take appropriate safeguards to protect them from damage.
Torque all 1/2" Grade 8 hardware to 120 ft-lbs (163 N-m). Torque M14-10.9 hardware to 148 ft-lbs (201 N-m). Fasteners must be tightened in the following sequence: (1) torque the mounting rails to the frame brackets, then (2) torque the frame brackets to the truck frame.
The installation sequence is: (1) Lower and remove spare tire if needed; (2) On gas engines, relocate vapor tube and install L-bracket; (3) Position rear mounting rail on truck bed, centered between weld seams; (4) Mark and center-punch holes, drill 1/8" pilot holes; (5) Temporarily position frame brackets and verify alignment; (6) Enlarge holes to 9/16"; (7) Loosely install frame brackets with M14 bolts and nuts—snug but do not tighten; (8) Reposition mounting rail over holes; (9) Install 1/2" carriage bolts with U-shaped spacers and conical washers, tighten snug; (10) Position second mounting rail with hitch saddle/slider/goose; (11) Repeat steps 5–9 on passenger side; (12) Torque fasteners in sequence (rails to brackets, then brackets to frame); (13) On gas engines, tighten tube holder with factory flange nut; (14) Reinstall spare tire if removed.
No. In Step 7, insert the M14 bolts and nuts into the frame brackets and snug them, but do not tighten. The bolts are tightened only in Step 12, after the mounting rails are positioned and the carriage bolts are installed. This sequence ensures proper alignment.
The U-shaped spacer is installed in the corrugation between the truck box and the mounting rails before inserting the 1/2" carriage bolts. It ensures metal-to-metal contact between the mounting rail and the truck bed floor, which is critical for proper load distribution and structural integrity.
Place the unassembled fifth wheel saddle, slider, or goose into the first installed mounting rail. Position the second mounting rail by inserting its tabs into the first rail and pushing it tight toward the other rail. Ensure the second rail is centered between the weld seams on the truck bed floor. If more than one hitch product will be used with the rails, install both products at the same time to align the second rail and ensure neither product compromises the fit of the other.
Do not exceed the towing vehicle manufacturer's recommended vehicle towing capacity. Additionally, always measure your truck and trailer before installing the hitch to ensure there is adequate clearance at the cab and bumper to allow for turns.
Check the mounting system bolt tightness once per year. Refer to the mounting bracket rating label for the correct weight capacity. Save the warranty sheet and receipt for any future support.
The 56016 fastener kit (56016F) includes: (1) 4× M14 × 45 bolts with washers; (2) 4× M14 nuts with retainers; (3) 1× driver's side frame bracket; (4) 1× passenger's side frame bracket; (5) 2× 1/4" flat washers; (6) 1× 1/4"-20 nylok nut; (7) 1× 1/4"-20 × 1 1/4" Grade 2 hex head bolt; (8) 1× L-bracket. All other fasteners mentioned in the instructions are supplied with part number 30153.
No. Use only the bolts, nuts, and washers supplied with the 56016 kit to install it. All bolts and nuts are Grade 8 unless otherwise specified. Using non-supplied fasteners may compromise the structural integrity and safety of the installation.
Read all instructions before starting the installation. Visit www.ReeseProducts.com to verify that your kit contains the most recent revision of the installation instructions and to confirm that your vehicle application is supported. Always measure your truck and trailer before installing to ensure clearance at the cab and bumper for turns.
Yes, the 56016 is designed for Ford Super Duty F-250, F-350, and F-450 models and works with REESE® 30153 rails only. Verify your specific truck year and configuration at www.ReeseProducts.com before purchasing.
You need wrenches (3/4", 7/8", 15/16", 15 mm, 18 mm), drill bits (1/8", 9/16"), a center punch, and a measuring tape. The fastener kit 56016F is included.
Yes. You must drill 1/8" pilot holes and enlarge them to 9/16". When drilling, protect brake lines and fuel tanks from damage.
No. Plastic bed liners must be cut away to expose metal. Spray-in bed liners are acceptable; consult your installer for curing time.
Yes. On gas engines only, the vapor tube on the driver's side frame rail must be relocated before installing the driver's side bracket. Use the supplied L-bracket and 1/4" hardware. Diesel engines do not require this step.
Torque 1/2" Grade 8 hardware to 120 ft-lbs (163 N-m) and M14-10.9 hardware to 148 ft-lbs (201 N-m). Tighten in sequence: rails to brackets first, then brackets to frame.
Do not exceed your vehicle manufacturer's recommended towing capacity. Measure your truck and trailer before installation to ensure clearance at the cab and bumper for turns.
Check mounting system bolt tightness once per year to ensure the installation remains secure.
In Step 5, temporarily position the frame brackets on the outside of the frame and verify that the 1/8" drilled holes align with the slots of the frame bracket before enlarging them. If the holes do not align, remove the frame bracket and recheck the hole positions against Figure 2. Ensure the mounting rail is centered between the weld seams and at the correct distance from the rear edge of the truck box. Adjust the hole positions as needed and re-drill before enlarging to 9/16".
The mounting rail may shift if the carriage bolts are not tightened sufficiently or if the fasteners are not torqued in the correct sequence. In Step 9, tighten the carriage bolts snug to keep the mounting rail from moving. In Step 12, torque all fasteners in the specified sequence: (1) torque the mounting rails to the frame brackets, then (2) torque the frame brackets to the truck frame. Use the correct torque values: 120 ft-lbs for 1/2" Grade 8 hardware and 148 ft-lbs for M14-10.9 hardware.
Ensure that the second mounting rail is centered between the weld seams on the truck bed floor and that the tabs are fully inserted into the first mounting rail before pushing it tight. If the fit is still loose, verify that the first mounting rail is properly centered and that all carriage bolts are tightened snug. If multiple hitch products are being used, ensure both products are installed simultaneously to achieve proper alignment.
Stop work immediately. The manual warns that when drilling holes, you must be aware of potential risks to vehicle components such as brake lines and fuel tanks and take appropriate safeguards to protect them from damage. If damage has occurred, do not attempt to repair it yourself. Contact a qualified mechanic or the vehicle manufacturer for professional repair. Do not operate the vehicle until the damage is repaired.
The vapor tube must be rotated up and out of the way before installing the L-bracket. If the tube is stuck or difficult to move, do not force it, as this may cause damage. Gently work the tube into position, ensuring it does not kink or crack. The tube holder should be left loose during bracket installation (Step 2) to provide clearance. If you encounter significant resistance, consult a qualified mechanic familiar with your specific truck model.
Sam
Ordered online. Shipment arrived on time and with all the correct parts. Great customer service and friendly staff. Also, pricing was great!
May 22, 2023

Total for 1 item:
$305.22$308.75
On Sale Today
You save $29.07 (16%)
Free Shipping
Ships free on all orders
 Authorized Dealer
FREE ShippingFREE SHIPPING
Estimated delivery Wed, Nov 11 - Sat, Nov 14
Order before 2 PM EST Monday–Friday for same-day processing
Guaranteed safe & secure checkout